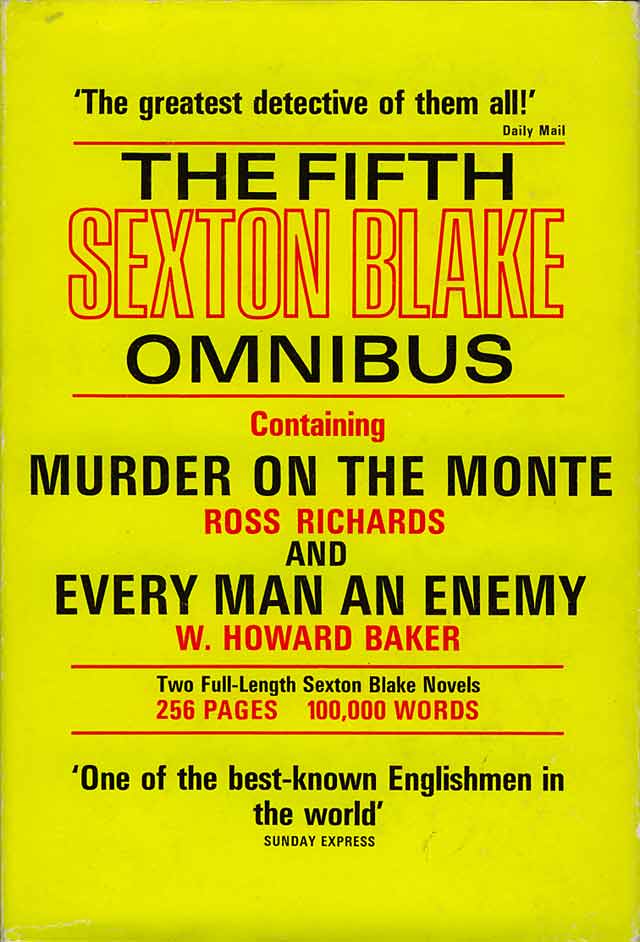
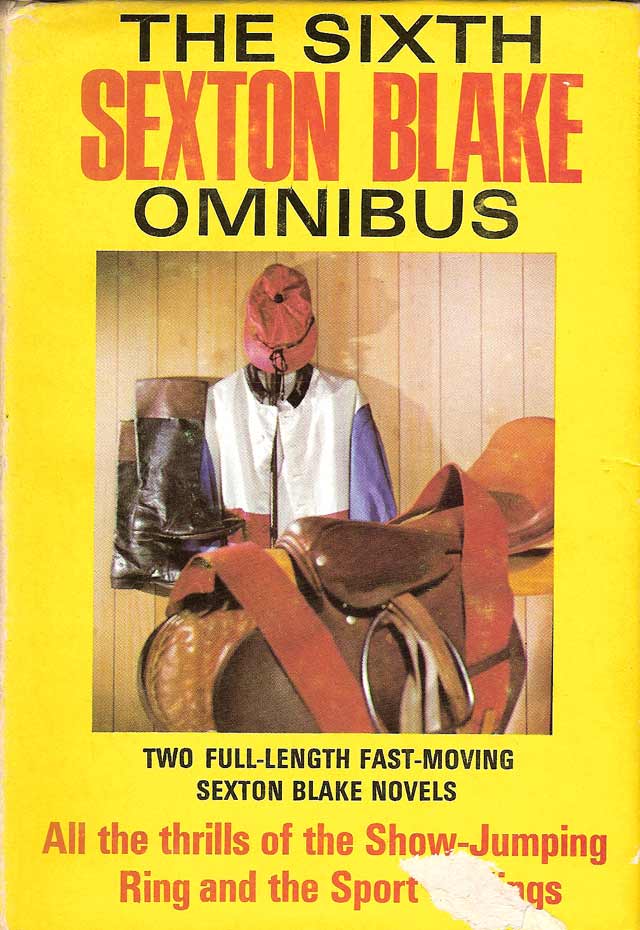
Sexton Blake Bibliography: 1969
Notes: A reprint of SEXTON BLAKE LIBRARY 5th series novel 24 (1966).
Unrated
Notes: A reprint of SEXTON BLAKE LIBRARY 5th series novel 22 (1966).
Unrated
Notes: A reprint of SEXTON BLAKE LIBRARY 5th series novel 35 (1967).
Unrated
Notes: A reprint of SEXTON BLAKE LIBRARY 5th series novel 31 (1966).
Unrated
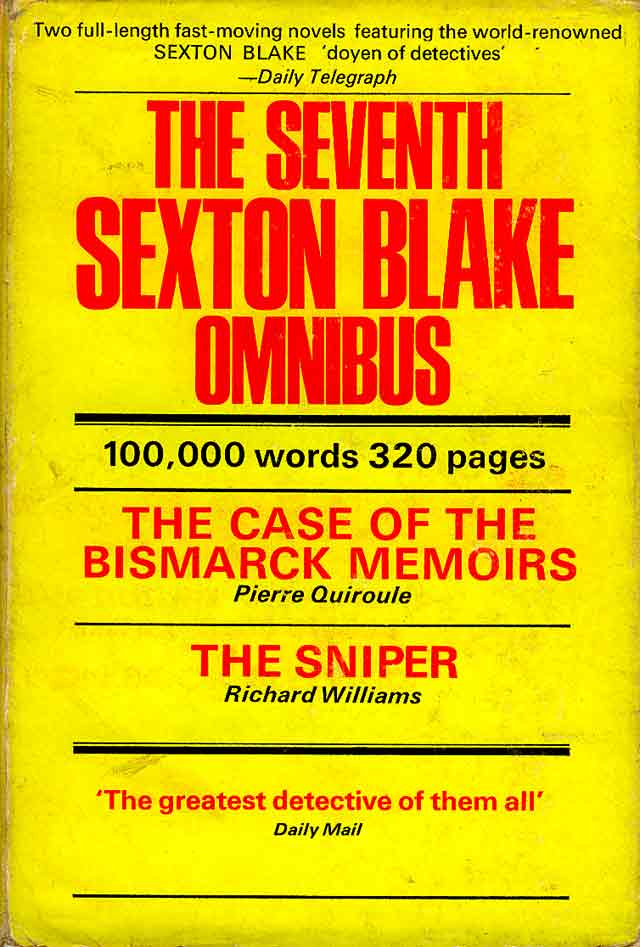
Notes: In 1890, Prince Bismarck's private secretary stores a box filled with his employer's memoirs in the vaults of Goyle's Bank, London. He puts the bank receipt in a flask which he throws into the Thames. He is never seen again. Thirty years later, the flask is found by a river worker who takes it to Sexton Blake. A German agent named Stromburg has a brief tussle with the detective before raiding the bank and stealing the memoirs. By intercepting a letter from Lord Vavasour to Stromburg's employer, Count Dorflisch, Blake learns what the box in the bank vault had contained. Vavasour's letter concerns a forthcoming meeting between him and Dorflisch. When this occurs at Vavasour's home, Mylton Towers, Dorflisch reveals that the memoirs contain damning facts about Vavasour's father. His attempted blackmail is cut short though; Vavasour leaves the room for a moment and when he returns he finds a man dead on the floor and Dorflisch gone. Even worse, he discovers that important government papers pertaining to Persia have been stolen from his desk. A disguised Sexton Blake arrives on the scene to investigate and sees that the dead man is Stromburg. Meanwhile, Sir Vyrmer Fane, head of the Secret Service, sends Granite Grant to find out what has become of the Persian documents. Mademoiselle Julie also appears on the scene. Between them, they identify the real killer, reclaim Vavasour's lost papers and recover the Bismarck memoirs.
Trivia: A reprint of SEXTON BLAKE LIBRARY 5th series novel 28 (1966), which in turn was a reprint of SEXTON BLAKE LIBRARY 1st
series issue 151 THE MYSTERY BOX (1920). The same tale also appeared in THE SEXTON BLAKE LIBRARY 2nd series issue 432 (1934) under the original title. The review notes are based on a reading of the original issue.
Rating: ★★★☆☆
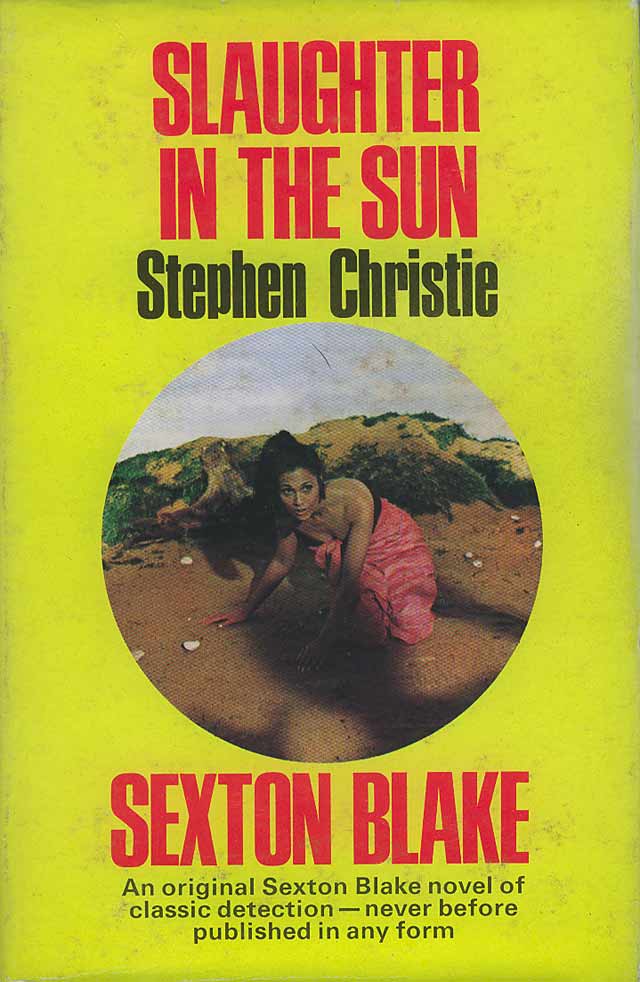
Notes: A reprint of SEXTON BLAKE LIBRARY 5th series novel 19 (1965).
Unrated
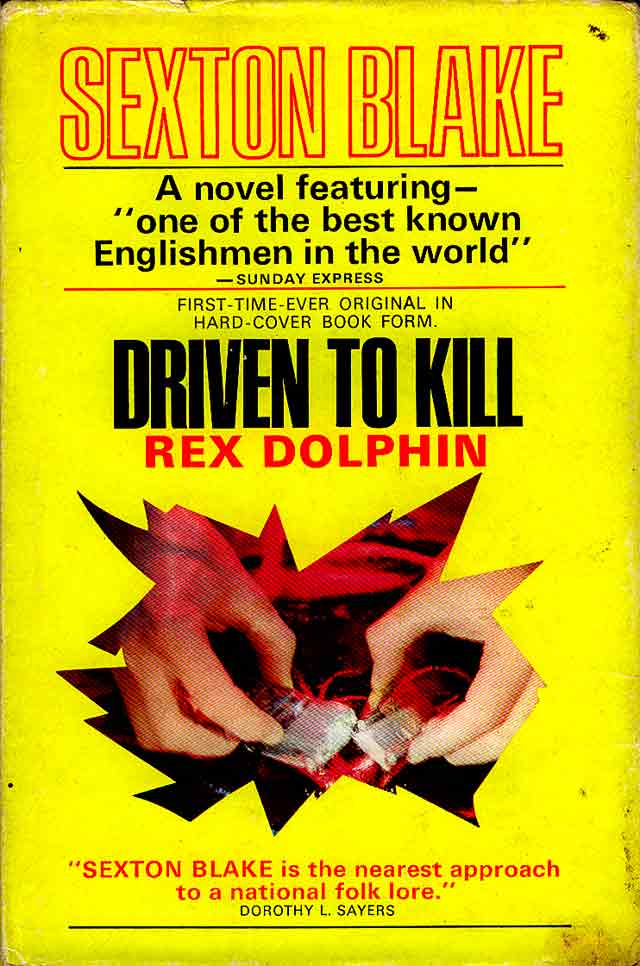
NOVEL · 1969 · Howard Baker Books · 16'
Illustrator: None
Other content: None
Notes: Car safety designer Guy Wyndham's company, once independent, is now owned by a giant corporation known as The Group, which is owned by Sir Stuart Nathan. Nathan is among a group of people — including Wyndham — who have been targeted by SAMBA: The Society for the Abolition of Murder by Automobile. Nathan calls in Detective Superintendent Leonard Faulkner to deal with the threatening letters sent by this mysterious organisation. Faulkner, though, sees nothing illegal about them, so Nathan places an appeal in the newspapers to anyone else who has received such letters and arranges to meet with them. Meanwhile, Frank O'Malley, ex-Group employee and now motoring correspondent for the Daily Post, obsesses about Joy Buckland, daughter of Sexton Blake's friend, John. When she is involved in a fatal car accident, her body vanishes from the scene. John Buckland asks Blake to find her and the detective is also approached by Nathan who, on behalf of the people he has gathered, asks him to investigate SAMBA. Blake finds an electronic device overlooking the sharp bend where Joy's crash occurred and sends it for analysis. It proves to be one of many signalling devices which SAMBA seems to have placed at selected accident black spots around the country — it sends out an automated signal whenever a crash is detected. Blake and Arthur 'Splash' Kirby attend the launch of The Group's latest car. When the vehicle is unveiled, Joy Buckland's dead body is inside. SAMBA has upped its campaign and begins sending body parts to its targets. When O'Malley receives a crate containing the charred remains of a crash victim, the owner of the Daily Post — Silas Cudmore, the Baron Charmwood — orders his journalists to attack SAMBA. However, after narrowly avoiding a road accident himself, he changes his mind and directs them to support the organisation. Blake, believes O'Malley to be central to events and he is proved right when the reporter is savagely murdered. Realising that Nathan's secretary knows that she is next on the murderer's hit list and has fled, Blake — with Splash Kirby and Marion Lang — gives chase. They catch up with the girl just as she is tackled by the mastermind behind SAMBA. Saving her life, Blake exposes SAMBA as a one-man operation. He identifies the villain and the motive. The story ends with an almighty crash.
Trivia: This story doesn't feature Tinker but sees the very welcome return of Mrs Martha Bardell. The tale is full of information about Sexton Blake. What's more, it acknowledges his past, with mentions for most of the 'supervillains' from the detective's 'Golden Age'. Blake's address is given as 252 Baker Street. The house is described as 'oldish', five storeys, with low walls in front which once had railings. It has a yard deep porch and the front door, wooden and painted brown, is covered with grafitti. The inside hall is rather shabby, not reflective of Blake's quarters on the fifth floor. In the detective's study, there stands the original Sexton Blake bust by Eric Parker and a big, scarred old desk.
Rating: ★★★☆☆

VALIANT · 04/01/1969 · Fleetway Publications Ltd · 7d
Illustrator: Anon. (Eric Dadswell)
Other content: Various strips and text stories.
Notes: Blake strides forward to see who is in the manhole and discovers that it's Tinker. His assistant explains that he was knocked out and recovered at the bottom of a shaft. Suddenly someone shoots at them from inside a pillar-box. Blake realises that they must seek cover before they are picked off. Suddenly, the laughter of the phantom mummy rings out!
Rating: ☆☆☆☆☆

VALIANT · 11/01/1969 · Fleetway Publications Ltd · 7d
Illustrator: Anon. (Eric Dadswell)
Other content: Various strips and text stories.
Notes: Blake and Tinker hug the walls to shelter from the flying bullets but their safety is further threatened when a chimney collapses above them. They avoid the falling bricks and find among the wreckage a note warning them to leave the museum. Blake, Tinker and Degard move along to the next gallery. This one is themed around the Great War and, as the group enters, a machine gun is trained on them.
Rating: ☆☆☆☆☆

VALIANT · 18/01/1969 · Fleetway Publications Ltd · 7d
Illustrator: Anon. (Eric Dadswell)
Other content: Various strips and text stories.
Notes: Pedro leaps at the gunner, knocking him to the ground. However, by the time Blake and Tinker reach him, the bloodhound has a torn sleeve in his mouth but the gunner has vanished. Suddenly the mummy appears and pulls a lever which releases a gigantic cable drum. It crashes towards the detectives. They dive out of its path and Blake races after the mummy, wrestling it to the ground. He rips the bandages from its face revealing Ebenezer Crabtree who confesses that he was trying to scare Degard so badly that he would abandon his plans to demolish the museum.
Rating: ★★☆☆☆

VALIANT · 25/01/1969 · Fleetway Publications Ltd · 7d
Illustrator: Anon. (Eric Dadswell)
Other content: Various strips and text stories.
Notes: Sexton Blake receives a visitor at his Baker Street flat. Anthony McJames-Cross explains that some months ago his grandfather died and left his Devonshire estate — named Graveways — to a friend, Colonel Wesley Leighton. This came as a shock to McCross and, since that time, he has suffered a number of near-fatal misfortunes which he thinks were arranged. Blake tells his visitor to remain in London while he and Tinker travel to call on the Colonel. The next day, the detectives arrive at Graveways only to find themselves looking down the barrel of a shotgun.
Rating: ☆☆☆☆☆

VALIANT · 01/02/1969 · Fleetway Publications Ltd · 7d
Illustrator: Anon. (Eric Dadswell)
Other content: Various strips and text stories.
Notes: The gun-wielder proves to be Colonel Wesley Leighton, who decries McJames-Cross's story and orders Blake off the estate. When night falls, the detective and Tinker drive to the nearby Gateways Abbey where they are confronted by a ghostly figure.
Rating: ☆☆☆☆☆

VALIANT · 08/02/1969 · Fleetway Publications Ltd · 7d
Illustrator: Anon. (Eric Dadswell)
Other content: Various strips and text stories.
Notes: The sinister figure proves to be Colonel Leighton. The Colonel explains that, according to legend, a valuable treasure — the golden wreath of Emperor Augustus — is concealed somewhere inside Graveways Abbey ... and he intends to find it. As the Colonel leaves, Blake discovers the imprint of boots which suggest that someone else is nearby. With all his attention on this clue, the detective fails to see the shadow of a gigantic bat as it swoops towards him.
Rating: ☆☆☆☆☆

VALIANT · 15/02/1969 · Fleetway Publications Ltd · 7d
Illustrator: Anon. (Eric Dadswell)
Other content: Various strips and text stories.
Notes: A gigantic bat swoops overhead and disappears into the shadows around the abbey's roof. Blake rushes towards the building, feeling that the Colonel is in danger. A wailing cry echoes through the night and, when the detectives enter the old building, they find the Colonel, apparently dead. Suddenly a shadowy figure looms up before them!
Rating: ☆☆☆☆☆

VALIANT · 22/02/1969 · Fleetway Publications Ltd · 7d
Illustrator: Anon. (Eric Dadswell)
Other content: Various strips and text stories.
Notes: The figure emerges from the gloom and introduces itself as Dr. Adam Ashley. He examines the body of Colonel Leighton and says that he'd warned him not to search for the treasure, which according to legend is guarded by a giant bat. He advises Blake to leave but the investigator insists that the mystery of the abbey must be solved. Leaving the doctor, Blake and Tinker climb the tower steps. The next instant, the bat swoops down towards them!
Rating: ☆☆☆☆☆

VALIANT · 01/03/1969 · Fleetway Publications Ltd · 7d
Illustrator: Anon. (Eric Dadswell)
Other content: Various strips and text stories.
Notes: As the giant bat swoops, Tinker stumbles backwards against the ancient stonework of the tower. Beneath his weight, it crumbles and he falls out. Sexton Blake leaps forward and grabs his assistant's ankle, hauling him back into the tower. They continue their ascent until reaching a room at the top. Inside they find hundreds of bats. From the shadows of the rafters, a hooded figure watches them.
Rating: ☆☆☆☆☆

VALIANT · 15/03/1969 · Fleetway Publications Ltd · 7d
Illustrator: Anon. (Eric Dadswell)
Other content: Various strips and text stories.
Notes: As the bridge gives way beneath them, Blake and Tinker leap forward and grab the edge of a narrow stone ledge. The giant bat appears and swoops around them but Blake grabs its wing-tip, sending it crashing to the ground. Closer examination reveals the bat to be a man in a suit — and the man is Adam Ashley! The villain admits that he's been trying to frighten people off so he can search for the Wreath of Augustus. He then turns and flees, shooting at the detectives as they run after him. Pedro leaps forwards and disarms him and, as Ashley falls backwards, he dislodges a brick in the wall. In the cavity thus revealed, Blake finds the legendary wreath. Ashley is handed over to the police.
Rating: ☆☆☆☆☆

VALIANT · 22/03/1969 · Fleetway Publications Ltd · 7d
Illustrator: Anon. (Eric Dadswell)
Other content: Various strips and text stories.
Notes: Sexton Blake and Tinker are taking a holiday in Cornwall when a storm blows up. They look for shelter in the village of Pedstoe but are advised to avoid the Smuggler's Inn, which is said to be haunted by the Phantom Smuggler. Nevertheless, they head towards it. Suddenly, a tramp appears in the middle of the road. Blake swerves to avoid him but knocks him off the road and into a quarry. The detectives climb down to assist him and, while Blake returns to the car for a first aid kit, Tinker is confronted by a ghostly figure. He stumbles backwards and knocks himself unconscious. He recovers as Blake returns to find that the ghost and the tramp have vanished. The detectives continue on to the inn which is run by Silas Fyle. It has but one other guest; a man named Count Zetkin. Fyle tells Blake where to park his car but when the detective follows the directions he finds himself speeding out of control down a steep slope. Ahead of him, the Phantom Smuggler appears.
Rating: ☆☆☆☆☆

VALIANT · 29/03/1969 · Fleetway Publications Ltd · 7d
Illustrator: Anon. (Eric Dadswell)
Other content: Various strips and text stories.
Notes: Sexton Blake leaps from the car as it plunges over a cliff. He hangs desperately to the rockface. Later, at the inn, Tinker is haunted by the Phantom. Blake appears and helps him to fight it off before it then vanishes. Zerkin apologises for giving Blake the wrong directions, causing him to drive over the cliff. As they speak, a pair of hands reach towards the detective from a dark alcove.
Rating: ★★☆☆☆

VALIANT · 05/04/1969 · Fleetway Publications Ltd · 7d
Illustrator: Anon. (Eric Dadswell)
Other content: Various strips and text stories.
Notes: While Silas Fyle and Count Zetkin speak to Tinker, hands emerge from a secret panel to yank Sexton Blake into the darkness. A trapdoor opens beneath his feet. As he falls he tries to pull his attacker with him but finds himself clutching iron-clad gauntlets which have slipped off his assailant. He grabs a grill to break his fall and then climbs through an opening and returns to the main part of the inn. That night, he and Tinker keep watch. Upon hearing a footstep, Blake investigates and sees Fyle climbing the stairs with a body slung over his shoulder. It is the tramp who had been knocked into the quarry by the detective's car. Suddenly, the Phantom appears and throws a sword at Blake. A shouted warning from Tinker saves him. Blake grabs the sword but is knocked senseless as a shock surges through him.
Rating: ☆☆☆☆☆

VALIANT · 12/04/1969 · Fleetway Publications Ltd · 7d
Illustrator: Anon. (Eric Dadswell)
Other content: Various strips and text stories.
Notes: Blake recovers from the shock and discovers that the Phantom and his sword have vanished. He and Tinker race up the stairs and into a room where they are once again confronted by the ghostly figure. However, when Tinker lunges at it, the Phantom proves to be a dummy. A parrot gives them a clue which leads to a secret panel beyond which they find the tramp tied to a bed. He explains that he was captured and imprisoned for snooping... even though he was innocent of that charge. While Tinker escorts him to freedom, Blake takes his place on the bed. Suddenly the bed's head board snaps down over the detective, holding him in place. The bed begins to rise off the floor towards a blade afixed to the ceiling.
Rating: ☆☆☆☆☆

VALIANT · 19/04/1969 · Fleetway Publications Ltd · 7d
Illustrator: Anon. (Eric Dadswell)
Other content: Various strips and text stories.
Notes: The bed rises toward a spike in the ceiling, threatening to impale Blake. In the nick of time, the investigator manages to force the bed head up and jump clear. He finds Tinker and, when they hear footsteps, leaps on Silas Fyle and restrains him. Blake asks why Fyle imprisoned the tramp but Count Zerkin appears and explains that they simply gave the man shelter... someone else must have tied him up. Next morning, someone attacks Tinker and knocks him unconscious. Blake sees a glowing figure carrying his assistant away over the snow.
Rating: ★★☆☆☆

VALIANT · 26/04/1969 · Fleetway Publications Ltd · 7d
Illustrator: Anon. (Eric Dadswell)
Other content: Various strips and text stories.
Notes: Blake runs after the glowing figure which he sees carrying his unconscious assistant but finds himself sinking into quicksand. Tinker recovers in a hut and, hearing Blake's cries for help, breaks down the flimsy door and uses the wood to help his guv'nor struggle free. In the hut, they find a trapdoor and descend through it into a tunnel. Opening a circular door of rock that pivots on its base, they proceed down a slope but, behind them, Count Zetkin pushes the door, sending the huge rock rolling after them.
Rating: ☆☆☆☆☆

VALIANT · 03/05/1969 · Fleetway Publications Ltd · 7d
Illustrator: Anon. (Eric Dadswell)
Other content: Various strips and text stories.
Notes: Blake and Tinker fling themselves out of the path of the rolling rock, hanging over a precipice by their hands as the massive door rumbles past. They then continue their journey into the subterrenean depths. Suddenly Zetkin and Fyle appear and start shooting at the detectives. Seeking shelter, Blake and Tinker run into a dark room. A cage descends on to Tinker. It raises into the air and Blake leaps, holding it tightly. The cage passes through a trapdoor to the floor above, where Creel awaits. He rushes at Blake with sword raised.
Rating: ☆☆☆☆☆

VALIANT · 10/05/1969 · Fleetway Publications Ltd · 7d
Illustrator: Anon. (Eric Dadswell)
Other content: Various strips and text stories.
Notes: Blake ducks beneath the Phantom's sword and delivers a powerful uppercut which knocks the mysterious figure senseless. However, after freeing Tinker from the cage, the detective turns only to find that the Phantom has disappeared. The investigators follow a passage and find the glowing Phantom costume hanging on a hook. Continuing through the darkness they emerge on a ledge by the sea. They see Count Zerkin approaching but, before Blake can intercept him, two hands reach up out of the sea and pull the detective beneath the water. Blake finds himself fighting for his life against a knife-wielding frogman.
Rating: ☆☆☆☆☆

VALIANT · 17/05/1969 · Fleetway Publications Ltd · 7d
Illustrator: Anon. (Eric Dadswell)
Other content: Various strips and text stories.
Notes: While Sexton Blake struggles with the frogman beneath the water, Count Zetkin holds Tinker at gunpoint. Presently the frogman emerges but, as a fist to Zetkin's chin quickly proves, the diving suit-clad figure is, in fact, Blake. The detective's attacker crawls out of the sea and is revealed to be Krantz, also known as The Phantom Smuggler. Blake leads his prisoners back to the inn where Silas Fyle, seeing that the game is up, flings a lamp to the floor, starting a fire. Krantz makes an attempt to escape but is overpowered by Blake. The police arrive and the villains are taken into custody, ending the adventure.
Rating: ☆☆☆☆☆

VALIANT · 24/05/1969 · Fleetway Publications Ltd · 7d
Illustrator: Anon. (Eric Dadswell)
Other content: Various strips and text stories.
Notes: While driving in the countryside, Sexton Blake and Tinker try to shelter from a storm in a nearby cottage. It's owner, who was once caretaker at the nearby Waldo's Waxworks, tells them that the museum is haunted by the ghost of a Roundhead. The detectives go to investigate and are confronted by the ghost which shoots a pistol at Blake. The detective collapses.
Rating: ☆☆☆☆☆

VALIANT · 31/05/1969 · Fleetway Publications Ltd · 7d
Illustrator: Anon. (Eric Dadswell)
Other content: Various strips and text stories.
Notes: Blake regains consciousness — the gun had fired some sort of knockout gas. The detectives watch as the spectral figure disappears through a solid brick wall. Suddenly a nearby tree is struck by lightning and topples towards Tinker. Blake manages to push it aside in the nick of time. The detectives spend the night in a hotel and, the next morning, decide to visit Waldo's Waxworks. The hotel waiter informs them that during the civil war, when the museum was a mansion house, a Roundhead had been slain there and has haunted the building ever since. Blake and Tinker visit the museum and are confronted by the ghost which lurks behind a curtain.
Rating: ☆☆☆☆☆

VALIANT · 07/06/1969 · Fleetway Publications Ltd · 7d
Illustrator: Anon. (Eric Dadswell)
Other content: Various strips and text stories.
Notes: Blake tears back the curtain only to find that the Roundhead is actually a wax display dummy. A further exploration of the exhibition leads Blake and Tinker to the Chamber of Doom, which offers to pay £50 to any visitor brave enough to spend a night alone inside. Blake approaches Waldo, the owner of the waxworks, and offers to take up the challenge. At one hour to midnight, he enters the chamber and finds himself surrounded by grim figures, including an executioner who strikes at him with a great axe. Blake grabs a sword and defeats his opponent but, before he can unmask his attacker, the glowing form of the ghostyly Roundhead materialises. With his attention fixed on the spectre, the detective doesn't see the hands which reach out from the carriage behind him.
Rating: ☆☆☆☆☆

VALIANT · 14/06/1969 · Fleetway Publications Ltd · 7d
Illustrator: Anon. (Eric Dadswell)
Other content: Various strips and text stories.
Notes: Blake's unseen attacker hauls him into the darkness where the detective is clubbed into unconsciousness. When he regains his senses he finds himself manacled in a cell with three other prisoners... but then discovers that they are waxworks. While he searches for a means of escape, Tinker re-enters the museum and follows a ghostly figure. It soon encounters Blake, who has found a way out of his cell, and launches a pikestaff at him. Tinker shouts a warning and the detective dodges but falls through a trapdoor. He drops into a tank of water and is dragged by the weight of his manacles to the bottom. Ghostly faces look on as Sexton Blake starts to drown.
Rating: ☆☆☆☆☆

VALIANT · 21/06/1969 · Fleetway Publications Ltd · 7d
Illustrator: Anon. (Eric Dadswell)
Other content: Various strips and text stories.
Notes: Tinker hurls an axe at the glass tank, smashing it. The water floods out and Sexton Blake emerges, unharmed. A key clatters onto the floor, thrown by an unseen presence. It fits the locks of Blake's manacles, allowing the detective to free himself. He and his assistant move on through the museum until suddenly one of the waxworks grabs Tinker and makes off into the shadows. Blake gives chase but loses the trail. Hearing a cry, he enters a room filled with dummy heads and torsos.
Rating: ☆☆☆☆☆

VALIANT · 28/06/1969 · Fleetway Publications Ltd · 7d
Illustrator: Anon. (Eric Dadswell)
Other content: Various strips and text stories.
Notes: Blake hears Tinker cry for help from within a large stone sarcophagus. As he approaches, it begins to sink into the floor. A waxwork Arab sheik suddenly throws a scimitar at Blake, which he catches as he dives after the stone coffin. In the chamber below, he uses the blade to prise open the lid, freeing Tinker. A rumble disturbs them and the ghostly Roundhead appears, gesturing towards a glowing message on the wall: Beware! Go ye now while there is still time!
Rating: ☆☆☆☆☆

VALIANT · 05/07/1969 · Fleetway Publications Ltd · 7d
Illustrator: Anon. (Eric Dadswell)
Other content: Various strips and text stories.
Notes: Sexton Blake throws a sword at the ghostly figure of the Roundhead but the blade passes right through and hits the wall beyond. The Roundhead vanishes. Blake and Tinker continue to search the waxworks and eventually encounter Anton Waldo who disdainfully observes that the detective has failed to solve the mystery. Blake refutes this and says that he will return tomorrow. As he and Tinker leave the building, they hear a terrible scream. Waldo cames racing after them, claiming to have seen the ghost. They return to the waxworks and Waldo promptly vanishes. A suit of armour attacks Blake and Tinker tumbles backwards down some stairs. As he lays at the bottom, a masked archer appears and shoots an arrow at him.
Rating: ☆☆☆☆☆

VALIANT · 12/07/1969 · Fleetway Publications Ltd · 7d
Illustrator: Anon. (Eric Dadswell)
Other content: Various strips and text stories.
Notes: Sexton Blake hurls a stool at the arrow, deflecting it in mid-flight. As he and Tinker continue their search of the wax museum, they are suddenly confronted by a group of waxworks which seem to have come to life. Tinker falls through a trapdoor and Blake hurls himself after his assistant. They plunge into water which empties into a river. The next morning, they observe Anton Waldo through the window of his home. A shot is fired and the old man collapses. As the attacker speeds away in a car, Blake instructs Tinker to call the police.
Rating: ☆☆☆☆☆

VALIANT · 19/07/1969 · Fleetway Publications Ltd · 7d
Illustrator: Anon. (Eric Dadswell)
Other content: Various strips and text stories.
Notes: When the police arrive they discover that the body of Anton Waldo is, in fact, a waxwork. Blake tells them to accompany him to the Midshire Bank. There, they find Waldo holding two men at gunpoint. The three of them had been planning to raid the bank's vault but Waldo had realised that his henchmen were seeking to betray him. Before the crooks can resolve their problems, the police and Sexton Blake swoop and capture them. The detective then leads the way through an underground passage that connects the bank with the waxwork museum. Here, they are confronted by living waxworks... which prove to be more of Waldo's gang cleverly disguised. The two groups clash and, during the fight, a lamp is overturned, setting the museum ablaze. the adventure ends with the villains captured and the museum destroyed.
Rating: ☆☆☆☆☆

VALIANT · 26/07/1969 · Fleetway Publications Ltd · 7d
Illustrator: Anon. (Eric Dadswell)
Other content: Various strips and text stories.
Notes: When a locomotive screeches to a halt after nearly running into Sexton Blake's car at a level crossing, the train driver explains that he had been attacked by a huge and ghostly black vulture which had come from the nearby old Moat House. Blake and Tinker drive to the building to investigate and find an unconscious hiker who, upon regaining his senses, tells a similar story. Blake takes hold of house's iron gate but, at that moment, the vulture descends and an electric shock sends the detective flying.
Rating: ☆☆☆☆☆

VALIANT · 02/08/1969 · Fleetway Publications Ltd · 7d
Illustrator: Anon. (Eric Dadswell)
Other content: Various strips and text stories.
Notes: As Sexton Blake lays unconscious the gigantic black vulture seizes Tinker and carries him into the air. By the time the detective recovers his senses, his assistent has vanished. A man approaches and tells him that he saw the vulture flying to Razor Rock with a victim in its claws. Blake races to the rock and sees Tinker laying unconscious at its summit. He makes the perilous climb to the top and helps the lad down. They then return to the moathouse and enter, only to find themselves trapped inside when a steel cage descends upon them. As the vulture reappears, the floor beneath them begins to rise.
Rating: ☆☆☆☆☆

VALIANT · 09/08/1969 · Fleetway Publications Ltd · 7d
Illustrator: Anon. (Eric Dadswell)
Other content: Various strips and text stories.
Notes: Sexton Blake and Tinker are lifted up into the roof. Blake is able to pull the bars of the cage apart and he and his assistant leap out onto a large rafter. Suddenly, the Black Vulture appears and tries to knock them from their perch. They run to shelter but find, in a nook in the wall, a cluster of evil faces looking at them. Moving away, they are struck by a blast of cold air upon which rides the vulture. Twin blasts of fire shoot from its eyes.
Rating: ☆☆☆☆☆

VALIANT · 16/08/1969 · Fleetway Publications Ltd · 7d
Illustrator: Anon. (Eric Dadswell)
Other content: Various strips and text stories.
Notes: The burning rafter collapses and Sexton Blake and Tinker plummet to the ground, through an open trapdoor and into water. They swim along the underround river until they emerge in a large cavern. While Blake lights a torch found in a wall bracket, a giant octopus slides out of the water and attacks Tinker. Blake uses the torch as a weapon and saves his assistant. They then follow a carved stairway up towards a round stone door. Suddenly it opens, detaches from its frame, and thunders down at them, closely followed by the giant black vulture.
Rating: ☆☆☆☆☆

VALIANT · 23/08/1969 · Fleetway Publications Ltd · 7d
Illustrator: Anon. (Eric Dadswell)
Other content: Various strips and text stories.
Notes: Blake wrenches a slab of stone from the crumbling wall and he and Tinker shelter beside it as the stone door hits it and bounces harmlessly over them. With the Black Vulture seeming to have vanished, the detectives proceed up the staircase to the room at the top, which they find to be filled with sinister artifacts. Before they can leave, the doorway they have just passed through is blocked by roaring flames. A large African drum in the room begins to beat a rhythm, though there is no-one visible playing it. While they are distracted, the Black Vulture swoops overhead and severs a thread, releasing a razor sharp scimitar which plummets towards them.
Rating: ☆☆☆☆☆

VALIANT · 30/08/1969 · Fleetway Publications Ltd · 7d
Illustrator: Anon. (Eric Dadswell)
Other content: Various strips and text stories.
Notes: Blake and Tinker leap aside as the scimitar falls between them. A glowing message appears on the wall, warning them that All who tarry betwen these walls are doomed! Suddenly, a beam of light glares out from the eyes of a giant idol. The detectives approach it but a trapdoor swings open and Tinker plummets into darkness. Vapour shoots from the idol's mouth and Blake collapses unconscious. Above him, the Black Vulture prepares to swoop.
Rating: ☆☆☆☆☆

VALIANT · 06/09/1969 · Fleetway Publications Ltd · 7d
Illustrator: Anon. (Eric Dadswell)
Other content: Various strips and text stories.
Notes: As uncanny figures swirl around him, Sexton Blake sees the Black Vulture swooping down. Grabbing a spear from the wall, he throws it but it passes straight through the giant bird without harming it and crashes against a gong. At the sound, a door swings open in the idol. Blake enters and descends a staircase to a room in which he finds Tinker. They see a shadowy figure at the top of the stairs but when they give chase the staircase turns into a slide, pitching them back into the room. Blake opens a door and a huge torrent of water floods in.
Rating: ☆☆☆☆☆

VALIANT · 13/09/1969 · Fleetway Publications Ltd · 7d
Illustrator: Anon. (Eric Dadswell)
Other content: Various strips and text stories.
Notes: The room floods but not all the way to its roof; Blake and Tinker have enough room to swim out into the open air. The Black Vulture flies overhead and vanishes into the gloom around the old moathouse. The two detectives enter the building where they are startled by a scream. They follow the sound and enter a room. In the opposite wall they see a steel door covered with keys. Suddenly a spiked plate crashes down behind them cutting off their escape route. It begins to slide towards them. Their only way out is to hope that one of the keys will open the steel door!
Rating: ☆☆☆☆☆

VALIANT · 20/09/1969 · Fleetway Publications Ltd · 7d
Illustrator: Anon. (Eric Dadswell)
Other content: Various strips and text stories.
Notes: Blake and Tinker frantically turn the many keys of the door as the spiked wall rumbles towards them. At the last possible moment, the door opens and they escape into a passage which they follow to the main hall. Here they are attacked by the black vulture but Blake swipes at it with a pikestaff, sending it crashing to the floor. The bird proves to be a radio-controlled model. A gangster and his henchmen emerge from the darkness. Blake lunges forwards but is shot. He falls, apparently dead.
Rating: ☆☆☆☆☆

VALIANT · 27/09/1969 · Fleetway Publications Ltd · 7d
Illustrator: Anon. (Eric Dadswell)
Other content: Various strips and text stories.
Notes: The gang leave Tinker tied up and set off for Dyson's cottage. Blake sits up and tells Tinker that the bullet had only scratched him. He unties his assistant and they seek a way out of the castle. When they see the villains returning from the cottage with the loot, Blake ducks back inside the building. The gang suddenly find themselves attacked by the Black Vulture. Under cover of this distraction, Sexton Blake (who had sent the model bird flying towards them) leaps on the gang and overpowers them. The police arrive and the loot is revealed to be stolen goods from a burglary which occurred some years ago.
Rating: ☆☆☆☆☆

VALIANT · 04/10/1969 · Fleetway Publications Ltd · 7d
Illustrator: Anon. (Eric Dadswell)
Other content: Various strips and text stories.
Notes: Sexton Blake and Tinker are on a climbing holiday in the Lake District. Late one evening, they look down over Bleake Lake and see a ruined priory which they decide to visit. As they approach the building, they hear the ghostly tolling of a bell coming from beneath the surface of the water. Suddenly a terrified man runs out of the darkness. He explains that two hundred years ago the priory had been the home of Sir Nigel Bleake whose jewels were coveted by the wicked Baron Creel. The two men fought and, just as Creel had Sir Nigel at his mercy, the bell tower was hit by lightning. The bell fell from the tower, taking Creel with it into the depths of the lake. Now, whenever it his heard tolling, it heralds the appearance of the phantom of Baron Creel! Suddenly, the ringing is heard again... and a spectral figure appears!
Rating: ☆☆☆☆☆

VALIANT · 11/10/1969 · Fleetway Publications Ltd · 7d
Illustrator: Anon. (Eric Dadswell)
Other content: Various strips and text stories.
Notes: The ghost of Baron Creel suddenly vanishes before Blake and Tinker's eyes. The detective approaches the door of the priory but is almost blinded as twin beams of light shoot out from the door knocker, which is carved into a likeness of Creel. As his vision returns, Blake sees the priory wreathed in flame and rushes inside to save Tinker. As he enters the gloom, the flames vanish — merely an optical illusion. He and his assistant move on into the priory and enter a hall of mirrors. In every mirror, they see the reflection of the Baron!
Rating: ☆☆☆☆☆

VALIANT · 18/10/1969 · Fleetway Publications Ltd · 7d
Illustrator: Anon. (Eric Dadswell)
Other content: Various strips and text stories.
Notes: Sexton Blake smashes all the mirrors but when the last is broken, there is no sign of Baron Creel, who had been reflected in every one of them. Blake catches sight of a shadowy figure and gives chase but ends up in an empty room with no visible means of exit. Before he can search for a secret door, he hears Tinker cry out. He returns to his assistant who can hear footsteps on the stairs, even though there's no-one visible. Blake realises that the noise is being caused by someone descending the steps on the other side of the wall. This proves to be the man who had originally told them about the ghost. He says he has to warn them of a deadly danger... at which point the glowing ghost suddenly appears!
Rating: ☆☆☆☆☆

VALIANT · 25/10/1969 · Fleetway Publications Ltd · 7d
Illustrator: Anon. (Eric Dadswell)
Other content: Various strips and text stories.
Notes: Ned Blagden leads Blake and Tinker away from the spectre of Baron Creel and through an arched doorway. From the shelter of the ancient priory, they hear the haunting toll of a bell from beneath the lake. They continue into the ancient building but while descending a staircase the steps suddenly swivel and Ned disappears through the secret trapdoor. Blake and Tinker race down to the crypt in search of him but find themselves locked in. Suddenly water floods in through an opening.
Rating: ☆☆☆☆☆

VALIANT · 01/11/1969 · Fleetway Publications Ltd · 7d
Illustrator: Anon. (Eric Dadswell)
Other content: Various strips and text stories.
Notes: As the chamber floods, Blake and Tinker search for a means of escape. It comes in the form of a baulk of timber which the rushing waters send crashing against the rusting bars of the aperture. This weakens the stonework, allowing Blake to break the bars away. The two detectives swim free and emerge in the grounds of the priory. Suddenly, the lid of a tomb opens and the ghost of Baron Creel emerges, carrying in its arms the limp form of Ned Blagden.
Rating: ☆☆☆☆☆

VALIANT · 15/11/1969 · Fleetway Publications Ltd · 7d
Illustrator: Anon. (Eric Dadswell)
Other content: Various strips and text stories.
Notes: As the ghostly figure of Baron Creel emerges from the painting and floats down the stairs, Ned Blagden loses his nerve and races for the door. Suddenly a massive iron chandelier plummets towards the two detectives. Blake leaps aside, pushing Tinker out of harm's way. When the dust settles, they see that the phantom has vanished. They leave the priory to search for Ned but, as they do so, a huge grizzly bear appears and grabs Tinker.
Rating: ☆☆☆☆☆

VALIANT · 22/11/1969 · Fleetway Publications Ltd · 7d
Illustrator: Anon. (Eric Dadswell)
Other content: Various strips and text stories.
Notes: The bear carries Tinker towards the bell tower. Blake tries to follow but finds his way blocked by the ghost of Baron Creel. Suddenly, hands grasp his shoulders and he is yanked into a doorway. The hands belong to Ned Blagden who explains that he was trying to save Blake. The detective ignores this and races to the bell tower. At the top, the bear throws Tinker over the edge.
Rating: ☆☆☆☆☆

VALIANT · 29/11/1969 · Fleetway Publications Ltd · 7d
Illustrator: Anon. (Eric Dadswell)
Other content: Various strips and text stories.
Notes: Tinker plunges into the lake below. Blake dives after him. The bear, in its fury, knocks an oil drum after the detectives. It impales itself on a mooring post and oil spills into the water. The ghost of Baron Creel appears and sets fire to the oil. Blake and Tinker find themselves surrounded by flames.
Rating: ☆☆☆☆☆

VALIANT · 06/12/1969 · Fleetway Publications Ltd · 7d
Illustrator: Anon. (Eric Dadswell)
Other content: Various strips and text stories.
Notes: The surface of the lake bursts into flames around Sexton Blake and Tinker. They dive into the water and swim beneath the surface until they can emerge beyond the burning oil. After a night spent in the local inn, the detective asks its owner where he can find Ned Blagden. The innkeeper insists that no-one of that name lives in or near the village. Blake and Tinker return to Bleake Priory. As they explore, the eyes of a statue — a bronze archer — follow them. Suddenly, the figure releases an arrow straight at Blake's back!
Rating: ☆☆☆☆☆

VALIANT · 13/12/1969 · Fleetway Publications Ltd · 7d
Illustrator: Anon. (Eric Dadswell)
Other content: Various strips and text stories.
Notes: Blake spots a gold watch on the stone floor and bends to pick it up. The arrow fired by the statue flies straight over his head. The archer vanishes. Blake and Tinker continue to explore and soon come to the chamber where Sir Nigel Bleake had been attacked by Baron Creel. Blake sits in a chair and iron bands suddenly snap around his wrists. The ghost of Baron Creel appears and approaches him, sword in hand.
Rating: ☆☆☆☆☆

VALIANT · 20/12/1969 · Fleetway Publications Ltd · 7d
Illustrator: Anon. (Eric Dadswell)
Other content: Various strips and text stories.
Notes: Sexton Blake kicks the heavy table in front of him into Baron Creel's path. Amid a cloud of smoke, the ghost vanishes. Tinker enters the room, having heard the crash, and Blake suddenly finds that his wrists are free. A scream echoes through the priory. Blake and Tinker follow the sound into a room where they find Ned Blagden unconscious on the floor. A secret panel is swinging closed, marking the passage of Ned's attacker. Blake reaches it too late but notices human footprints leading up to it. As he and Tinker discuss this new clue, a steel cage drops over them.
Rating: ☆☆☆☆☆